New update before the Alpha submission.
Since last time I modified the main desk and the chair. I did that so I can get them to a higher detail level, so that they will match the other objects in the room. By the end of this project I might modify some other objects as well.
What I also did was to play with the UE4 particle system. I created a flame for my candles and some 'light dust' in order to make the room feel more realistic.
I also added a light beam at the window, which helps with filling up that area, however I am not 100% happy with it and I will try and modify it for the next update.
The material on the wall is 100% proceduraly created using Substance Designer , however I will modify that one by the end update as well, since I think that is can be improved.
What is can be seen with the new chair is that it gives a more modern look to the room and it helps with the balance between the vintage objects and the new ones.
I still haven't created a material for the wood that is on top of the bed since it is not that important at the moment. I would not want the viewer to be admiring them.
As it can be seen, the beam of light is no great, however it works for now.
This is the end of this update.
Sunday, 27 November 2016
Tuesday, 22 November 2016
Long time, no post.
Hi everyone,
I haven't posted for a while on this blog simply because of the fact that I was busy with my final project and dissertation; and now, I post most of my stuff on Artstation
( https://www.artstation.com/artist/riprajanu ).
So now I am back to record my progress with my final year university project.
As usual, I started by thinking of an idea that I would love to do and than go online to find some reference for it, also some inspiration.
The next 4 images will show my intent, reference and the current stage that I was after a month (if I remember correctly) into the project, when we had to do our presentations.
As it can be seen, most of my video games reference are from the Uncharted 4 video game. This game is the reason why I choose to do a teenager's room. Especially after I saw Boon Cotter's lighting work that he has done for some of the rooms (https://www.artstation.com/artist/booncotter).
As for the style that I am going, I choose to do a normal modern room that contains a lot of vintage objects; and the main focus of the objects is to tell a story about the teenage girl (to describe her).
However, let's go back from the beginning of the project. I started by creating a simple block-out. I did this to get some ideas out and to see how the composition could work.
I had 5 different block-outs, however this is the one that had the most potential at that time. It is important to know that everything could change as I advance into the project.
Below is my progress, started from the block-out since the first scene in UE4.
I choose UE4 as the engine just because how friendly it is with the artists, because of what you are able to do in it and the high quality level that you can achieve.
The UE4 scene before I started texturing it.
The programs I used so far:
-The clothes, the bed covers, pillows and duvet were made in Marvelous Designer.
I followed these tutorials in order to understand and know how to work with MD:
http://viscorbel.com/bedding-tutorial-marvelous-designer/
-The rest of the projects in Maya 2016.
At this point I started thinking how I will do the textures maps, which object will share the same texture, which will be hero assets and which ones will have to do with tilling textures.
The current UE4 scene.
As you can see I textured almost all of the objects. However, this is only the first set of textures. I will go back over them later when I will have a better composition (room layout) and when all the objects are textures.
What still needs to be done:
-The outside view. I want to add a sunny beach view.
-More object in the clothing room. At the moment it feels too empty.
-Rearranging some of the objects. Making sure that everything works together.
-Improving the fabric shader that I have on the pillows.
The texturing was done using ZBrush, Substance Painter and Substance Designer.
Lighting was done with the help of the UE4 documentation and with a lot of experimentation. However, I will change it for sure till the end of the project.
I solved some of my lighting problems, mostly the artifacts, thanks to the UE4 guys (the staff). You can see what problems I had and how I solved them if you fallow the link:
https://answers.unrealengine.com/questions/518146/something-strange-is-happening-at-1-of-the-corners.html
This is the stage that I am with my project after 2 months.
From now on I will try to post more often and to make the post a bit more detailed.
See you guys with the next post,
Raz.
I haven't posted for a while on this blog simply because of the fact that I was busy with my final project and dissertation; and now, I post most of my stuff on Artstation
( https://www.artstation.com/artist/riprajanu ).
So now I am back to record my progress with my final year university project.
As usual, I started by thinking of an idea that I would love to do and than go online to find some reference for it, also some inspiration.
The next 4 images will show my intent, reference and the current stage that I was after a month (if I remember correctly) into the project, when we had to do our presentations.
As it can be seen, most of my video games reference are from the Uncharted 4 video game. This game is the reason why I choose to do a teenager's room. Especially after I saw Boon Cotter's lighting work that he has done for some of the rooms (https://www.artstation.com/artist/booncotter).
As for the style that I am going, I choose to do a normal modern room that contains a lot of vintage objects; and the main focus of the objects is to tell a story about the teenage girl (to describe her).
However, let's go back from the beginning of the project. I started by creating a simple block-out. I did this to get some ideas out and to see how the composition could work.
I had 5 different block-outs, however this is the one that had the most potential at that time. It is important to know that everything could change as I advance into the project.
Below is my progress, started from the block-out since the first scene in UE4.
I choose UE4 as the engine just because how friendly it is with the artists, because of what you are able to do in it and the high quality level that you can achieve.
The UE4 scene before I started texturing it.
The programs I used so far:
-The clothes, the bed covers, pillows and duvet were made in Marvelous Designer.
I followed these tutorials in order to understand and know how to work with MD:
http://viscorbel.com/bedding-tutorial-marvelous-designer/
-The rest of the projects in Maya 2016.
At this point I started thinking how I will do the textures maps, which object will share the same texture, which will be hero assets and which ones will have to do with tilling textures.
The current UE4 scene.
As you can see I textured almost all of the objects. However, this is only the first set of textures. I will go back over them later when I will have a better composition (room layout) and when all the objects are textures.
What still needs to be done:
-The outside view. I want to add a sunny beach view.
-More object in the clothing room. At the moment it feels too empty.
-Rearranging some of the objects. Making sure that everything works together.
-Improving the fabric shader that I have on the pillows.
The texturing was done using ZBrush, Substance Painter and Substance Designer.
Lighting was done with the help of the UE4 documentation and with a lot of experimentation. However, I will change it for sure till the end of the project.
I solved some of my lighting problems, mostly the artifacts, thanks to the UE4 guys (the staff). You can see what problems I had and how I solved them if you fallow the link:
https://answers.unrealengine.com/questions/518146/something-strange-is-happening-at-1-of-the-corners.html
This is the stage that I am with my project after 2 months.
From now on I will try to post more often and to make the post a bit more detailed.
See you guys with the next post,
Raz.
Wednesday, 27 April 2016
Winter Submission- Done.
I am finally finished with the re-submission for the winter project.
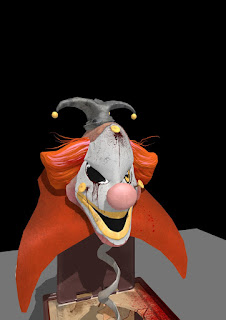
I am quite happy with how the new Jack in a box ended up looking. It is definitely an improvement from the other, and even if the textures on the box were scaled down they don't look that bad.
I am happy that I had the chance to do the modifications in only a week.
Monday, 25 April 2016
Done.
Hi everyone,
I am done with my 3D task for the Game Arts unit.
It has been a while since I started this project, but I learned a lot of new things from it; but I still had some stuff that I wanted to try but did not had the chance.
As you can see I included some screenshots from the scene view and from the game view. I am quite happy with how the scene ones look without all the image effects, but I wanted to have something that looked more cinematic in the end so that it will look like a short film when I animated the camera. I will try and see if there is a way of rendering out the animation, I would love to include that in my portfolio.
One of the things that I wanted to try and did not had the chance due to Unity's shader, was to blend textures so that I could have way less than I have at the moment. I literally had to go and do almost each object individually if I wanted the snow to be in a specific spot, which I did.
Even if our tutor provided a shader for us I was already done with texturing the environment when that happened.
Scene screenshots.
Game screenshots.
Even if I was done with the environment pretty fast, spending a lot of time in Unity trying to make it look good, I still think that if I was to do it again I could do it way better and faster.
Hopefully, I will have the chance to try and due a new one in the future, even if my dream is to be a concept artist I do not know where I will end, maybe I will have the chance to do something for film and there I will need to include a lot of 3D work since everything need to be really detailed.
Hope that you guys like what I have done with this project.
Labels:
Games Art,
Games Art Task: 3D ART,
Maya,
ZBrush
Sunday, 24 April 2016
Winter Submission- Face Update.
Just wanted to show a comparison between the new head and the old one.
I am quite happy with how the new one looks, especially on the overall noise which the first one was lacking. I consider that the new string of hair are boosting the overall shape, giving a more unique shape and a more interesting one. I am still thinking if I should do something else for the eye or just keep the current one. I might just modify it a bit,
Anyway, I am still working on it at the moment, but I am happy with how it looks.
Winter Submission- Box Update.
I have finish re-doing the box textures. It took me a while. I basically went through the old textures in Photoshop and rearrange them to match the new UV layout. I choose this method because it would have took me way longer to make it from scratch and at the moment I do not have so much time.
I will start working on the face again, hopefully I will finish it by the end of today.
Saturday, 23 April 2016
Winter Submission- Head Update.
So after I was done the new design for the head it was time to go in Maya and get started with the modifications that I wanted to do.
I just took the low poly version of the head in ZBrush and started to do the mask. I am happy with how the hair looks so I am not considering modifying it, just adding more stuff on top.
As I already got comfortable with ZBrush I did not had to look for any tutorial. I knew exactly what I had to do and where every tool is.
After finishing with ZBrush and getting the backed normal map from xNormal, I went in Quixel Suite 2.0 to get some material.
As I did before on this project I did not stood and did everything in Quixel. I just got the materials that I needed and closed it, since it is disturbing my workflow too much.
I am happy with how the head looks at the moment, I still want to do more stuff to it but now I need to do the textures for the box. I want to get everything to a certain level so that if I do not have time to submit the version that I want I could still submit a better version than the last one.
Wednesday, 20 April 2016
Winter Submission.
Hey everyone,
I have finally found out the mark for my winter submission, I got a B for my Jack in a Box and I am doing some improvement on it at the moment so I can resubmit it next Wednesday. Hopefully I can do everything I intended in just a week.
Some of the things that the tutor pointed out that pulled my mark down were:
1. The face of the Jack (the design that I choose did not match the overall object and it was too simplistic).
After talking with the tutor, I went and started doing some quick paint overs in Photoshop so I can get an interesting design before doing anything to it.
After a couple of tries I ended up with 5 designs which look better than the original. I decided to go for the 5th on because I consider that one to be the scariest and the most interesting one.
2. I had to many materials. I had 3 and I should have had 2. I understood perfectly what my tutor pointed out but I decided at the beginning of the project with the another tutor that guides us through the whole project that I should go for 3 materials just to get more details on the box and everything around it.
Anyway, before starting doing anything I went and searched for some good UV Map layout, just so I can have some reference. I found this one which shows a really clean and well distributed UV Map.
So I went and re-did the UV Maps, creating just one UV map. I need to tell that the new one looks more professional than the old one.
Now is time to do the materials.
Friday, 25 March 2016
An update from Unity.
Starting to put everything in unity, to create the mood and to animate the camera. I am almost there. I still need to finish putting the roots at the bottom and on the side of the big ground. I also need to see how many camera effects I will used.
I might create 1 more object for the environment and place it inside the temple. At the moment I do not know what it will be, but it will need to fit with the overall environment.
Hopefully, next time I will upload the finish version.
Labels:
Games Art,
Games Art Task: 3D ART,
Maya,
ZBrush
Monday, 21 March 2016
Watch Out For The Infected
Hi everyone,
Got some free time on my hand now and I started doing some stuff for my portfolio.
1.I did this one (which was inspired a bit by last of us and the hole idea if our world would really get infected by a virus).
2. I modified my artstation. Removed some works, modify the one that are still up and I will put this one as well there, hopefully in a better quality.
The link, if you guys want to check it out.
https://www.artstation.com/artwork/Z3xb1
Labels:
Concept Art,
Personal Work
Saturday, 27 February 2016
An update.
I am almost done with texturing the environment.
After finishing this is time to go in unity and put all the rest of the part (waterfall, smoke, mist).
I used Quixel Suite 2.0 to make all the textures.
But before I went and created all the textures I had to decide which engine I will use, Unity 5 or UE 4.
Even if I knew that UE 4 is more powerful than Unity 5 when it comes to rendering and you don t need to make too many modification before you get something looking decent, I had some problems with UE 4 when it came to textures and lighting; and after a couple of week of searching for an explanation and speaking with my tutor I decide to go with Unity for this time.
After I was done with choosing the engine, I encountered another problem. The Unity 5 base shader is not that diverse as the UE 4 one. So, I could not have only 1 rock texture and 1 snow texture and blend them together. I had to create individual texture for each rock so that the snow is placed where I wanted it to be.
The next update will be from Unity, hopefully I will have everything done by then.
Labels:
Games Art,
Games Art Task: 3D ART,
Maya,
ZBrush
Monday, 8 February 2016
A small update for the Games Art Task.
Just I small update to show the composition/layout of the environment and some of the objects that I already have the normal maps and ao maps.
As you can see I have used all the knowledge that I had got from the tutorials that I found at the beginning, but I still had some problems with some objects.
Like the sides of the stairs, which I already tried to make them a couple of times before I got them right.
While I was making them I looked at different videos, trying to combine them and get the result that I wanted.
Link: https://www.youtube.com/playlist?list=PLW62hxifbe18UVX1N_zqTlrR17j5oM1C3
Link: https://www.youtube.com/watch?v=6PSrQPizlTY
The tree did not give me to much problems. I exported everything combined into ZBrush and used the ZSpheres to build on top of it, so that the tree will go exactly where I wanted it to be.
Labels:
Games Art,
Games Art Task: 3D ART,
Maya,
ZBrush
Sunday, 24 January 2016
Games Art Task: 3D ART
New term, new assignment. In this term we had to choose for what we want to go for as our specialization and what we want to do for this term's assignment. We had 3D artist, 2D and Jack Of All Trades.
I went for the 3D environment artist and for this term's assignment I want to try and do a Naughty Dog environment art test and put it in a snowy environment.
So, as usual I started by gathering reference. Started with how the Naughty Dog environments art test look like and what makes them interesting, what I would like to include in mine and, of course, snow.
Started to do a quick sketch of how I imagine the environment. Did a quick block out but as you can see in the images below it did not look that interesting, so I decided to change it a bit. Is still not the final layout but it is an improvement.
Started to model and do the Normal Map and the AO Map for some parts that I new for sure that I would use them later on and I new how I would like them to look like.
I was really hard at first because it is the first time I do this and good videos that can explain what I needed to know were hard to find.
After searching for couple of hours on YouTube and on other websites I managed to find some tutorials that could help me.
The first one explains how to get from a clean mesh to a more damaged one.
The process was easy, fast and enjoyably so I had used it to create almost all of my assets to this point.
Link: https://www.youtube.com/watch?v=jMVeXv4bv9A
I also went and did some rocks and tried to do some snow with some tracks using only a displacement map for the snow.
For the rocks I found a very well done tutorial which explains how to do them, step by step.
That process was used to create all the rocks from my scene as well as other objects.
Link: https://www.youtube.com/watch?v=LtuKo2Tp1V0
For the snow, I had to go on other websites which have tutorials for Blender. So I had to watch them and try and adapt them to Maya.
The best one that I could find was on Blender Guru, but I could not replicate everything that he was doing, so I had to ask by tutors for help and try and improvise other solutions.
I do not know if I will use that snow in my final work but it was fun making it and I had the chance to learn some new stuff.
Link: http://www.blenderguru.com/tutorials/make-snow/
Labels:
Games Art,
Games Art Task: 3D ART,
Maya,
ZBrush
The first 3 weeks of the 2nd term in the modeling(Maya) class.
Due to the fact that in this term's assignment everyone is free to do whatever they want our teacher is trying to combine character stuff with environment. So in a week we do something related to characters and in the next one something for environment. These are the results till now. We still have to come back on them and I am sure that we will take the snake in ZBrush to detail it.
Sunday, 3 January 2016
Subscribe to:
Posts (Atom)